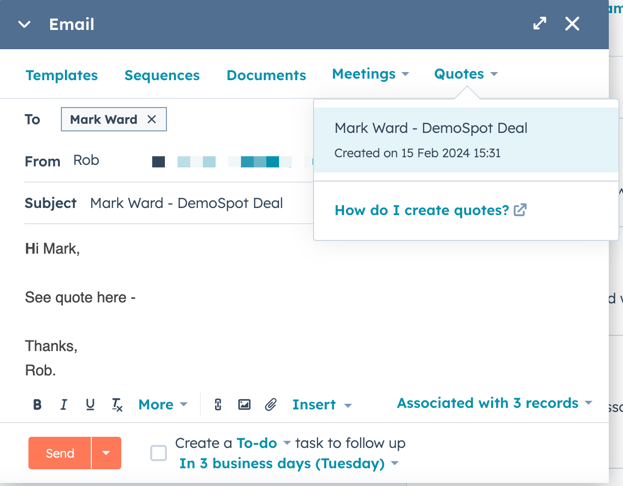
You can create quotes to share with contacts interested in buying a product or service. Use the quotes tool to create a web page that includes pricing information for line items.
Create quotes
- In your HubSpot account, navigate to Commerce > Quotes.
- Click Create quote.
- To associate the quote with a deal, click the Associate with a deal dropdown menu and select an existing deal, or click Create a new deal, fill the information and click Create
- Click Next.
- Continue setting up your quote following the steps below. You can save the quote as a draft at any step by clicking Save, then clicking Exit in the bottom left. Keep in mind that drafted quotes can still be enrolled in workflows. You can access the quote draft for editing directly from the quotes dashboard.
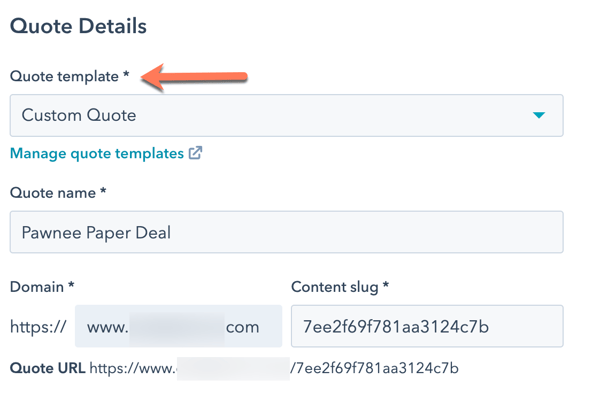
Step 1: Quote Details
Enter the details of your quote.
- Quote template: click the dropdown menu and select a template.
- Quote name: enter a name for your quote.
- Domain: this setting only applies if you're using a customized quote template. The domain is set by the quote template you selected. By default, the content slug uses a unique date and quote ID and does not need to be customized, but you can edit the page slug in the Content slug text field if needed.
- Expiration date: select an expiration date. When a quote expires, your contacts can no longer access it and will be prompted to contact your team.
- Quote language: select a quote language.
- Locale: select your locale to change the date and address display format for your quote. Keep in mind that the quote's currency format is inherited from the deal record's currency, so changing the quote's locale settings will not update the currency.
- Comments to buyer: enter any additional information that will be useful for your buyer. Use the formatting options at the bottom of the editing window to modify the text or insert a link. Click the textSnippet snippets icon to enter a short, reusable block of text.
- Purchase terms: enter any rules or regulations that your buyer should be aware of. Use the formatting options at the bottom of the editing window to modify the text or insert a link. Click the textSnippet snippets icon to enter a short, reusable block of text.
- To update the default color and logo that display, edit your sales tool branding in your account settings.
- Click Next.
Step 2: Buyer Information
Review and edit the contacts and companies that will appear on your quote. HubSpot will automatically add contacts and the primary company associated with the deal to the quote. To remove them from the quote, clear the checkbox next to their name.
To add a new or additional contact:
- Click Add another contact.
- In the right panel, search and select the checkboxes next to the contacts to include in the quote, then, click Save.
- Create or add existing association labels.
Step 3: Your Information
Verify that your personal information and company information is accurate. By default, your personal information is pulled from your profile and preferences and your company's information is set in your account settings.
 Please note: updating your profile information will not update previously created quotes. To update your information in a quote that has already been created, you'll need to follow the steps below to manually update it on the quote.
To edit your information for an individual quote:
- Click your name or company name.
- In the right panel, update your personal information.
- Click Save.
- Click Next.
Step 4: Line items
Review and edit the line items that will appear on your quote, along with adding discounts, taxes, and fees, and payment schedules to schedule payment installments.
Step 5: Signature & Payment
Decide how you want to collect signatures for your quote.
- Select the radio button next to a signature optn:
- No signature: no signature is required to authorize the quote.
- Include space for written signature: use a handwritten signature on a printed copy of the quote. You can later manually mark the quote as signed to indicate that all signatures are present.
- Use eSignature (Sales Hub Starter, Professional or Enterprise only): users with a paid Sales Hub seat can configure the quote to include a digital signature field.
- Select the checkbox next to the contact's email whose signature is required.
- Click the Countersigners dropdown menu and select a HubSpot user's name.
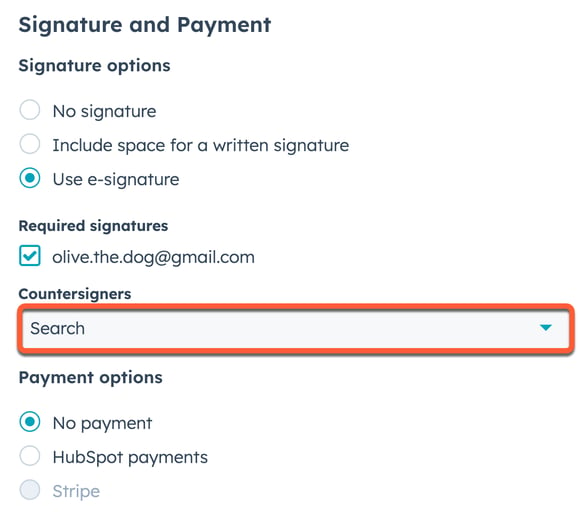
- Select the radio button next to a payment option:
- No payment: no payment will be collected using the quote.
- Stripe: select this option if you're using Stripe payment processing to bill your customers. (Stripe payment processing requires all items to be due at checkout.)
- HubSpot payments: select this option if you're using the HubSpot payments tool to process payments from customers, then customize the quote's payment options.
- Click Next.
Step 5: Review
This step provides a preview of your quote content. From here you can publish the quote, save it as a draft, or submit it for approval. To save the quote as a draft to edit at a later time, click Save, then click Exit in the bottom left to leave the quote editor.
Note: after saving a quote as a draft, you cannot edit the e-signature options in the Signature & Payment step. If you have quote approval workflows set up, keep in mind that quotes with a draft status can still be enrolled in the workflow.